Instructions
Ingredients & Supplies
~2 x 9-inch cake rounds, cooled and crumbled
~1–2 cups frosting of choice
~30oz candy melts or chocolate wafers of choice
neutral-flavoured vegetable oil
cake pop sticks (or toothpicks—see notes)
sprinkles or topping of choice
large rectangular Styrofoam or thick corrugated cardboard for curing
Styrofoam cone
plastic wrap
Method
Form the cake rounds
Add half of the cooled cake crumbs into a large bowl. Using an electric mixer, beat about ⅓ of the frosting into the cake crumbs, slowly adding more of each until you have a thick mixture that will hold a shape when pressed together and won’t stick to your hands (you may not need all the frosting).
Using a tablespoon measure, portion the cake mixture into small mounds (~24g each or 1¼ inches in diameter works best). Using clean hands, roll the mounds until they are fairly smooth and round then place on a parchment lined baking sheet, cover with plastic wrap and refrigerate for 2–3 hours or overnight. Remove the cake rounds from the fridge and, using clean hands, re-roll each to create a smooth ball. Place them back on the baking tray, cover and refrigerate for minimum one hour or until firm.
Coat and decorate
Add the candy melts/chocolate wafers to a double boiler and stir until melted and smooth. Stir in one teaspoon of vegetable oil, adding more as needed to help thin the coating and help prevent cracks. Transfer the melted coating into a heat proof two-cup glass measuring container.
Remove several of the cake rounds from the fridge and, working as quickly as possible, dip ½ inch of the cake pop stick in the melted coating, then insert it ¾ of the way into a cake round. Hold the stick and carefully dip the cake round into the coating—cover the entire cake round up to the base of the stick—then gently turn and tap off the excess. See notes below for using toothpicks.
While the coating is still wet, add sprinkles or topping of choice, then stick them upright into the foam/cardboard rectangle to cure. Repeat with the remaining cake rounds and allow them to cure completely in a cool location for a minimum of one hour. Once fully cured, transfer the cake pops onto a lined baking sheet, cover them in plastic wrap and store in the fridge for up to a day before assembling.
Assembly
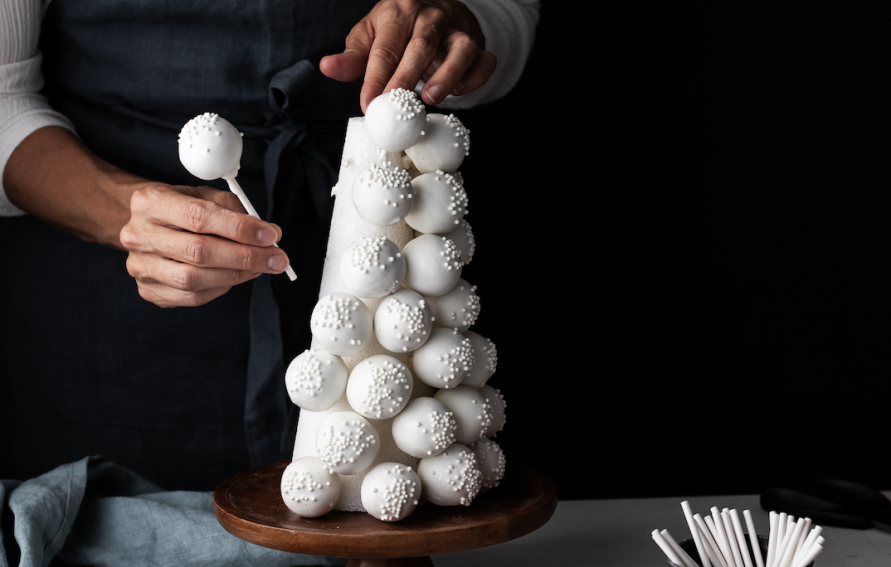
Use a spare cake pop stick or small dowel to make holes in the cone a little larger than the sticks themselves. Create the holes on a slight downward angle and space them approximately every 1½ inches (or roughly the same diameter of your cake pops). Work your way around the cone on a diagonal so each cake pop is nested between its neighbours. Wrap the cone with a layer of plastic wrap and place it on your serving dish. *See notes for working with a larger cone.
Starting at the base and working up, poke the finished cake pops through the plastic into the pre-made holes, holding the top of the cone to make sure it doesn’t topple. As you progress upwards, you will need to trim the cake pop sticks to accommodate the shortening depth of the cone. Add a final cake pop to the apex. Keep cool and serve promptly after assembly.
Notes
Use sturdy toothpicks instead of cake pop sticks—you will need to use a fork to dip the cake rounds in the coating, then cure them on a parchment lined baking sheet (note that this will leave a flat bottom on the final cake pop). Stick the toothpicks into the plastic wrapped cone as per above, leaving enough length exposed to hold the cake pop in place (if needed, use a small amount of hot glue to hold the toothpicks in place). Gently press each cake pop onto a toothpick working from the bottom up as per above.
Larger cones will require a firm base to attach to—a foam round, hot glue and wooden dowel can work for this purpose. Wrap the base in plastic as well.

